To choose an LED aluminium profile, match its internal width to the actual LED strip, then check heat load, diffuser depth, mounting style, environment, cable access, and future service. To install it well, dry-fit every component, then cut and deburr the channel. Clean the bonding surface, secure the profile, and apply the strip with full contact. Wire it safely and test the complete run before closing the diffuser.
That is the short version. The longer version matters because an LED profile does three jobs at once: it spreads heat, protects the strip, and controls how the light looks. Choose only by outside width and one of those jobs will eventually file a complaint.
This guide covers surface-mounted, recessed, corner, plaster-in, and suspended profiles. It also shows when a standard channel is enough and when a custom AL6063 extrusion makes sense.
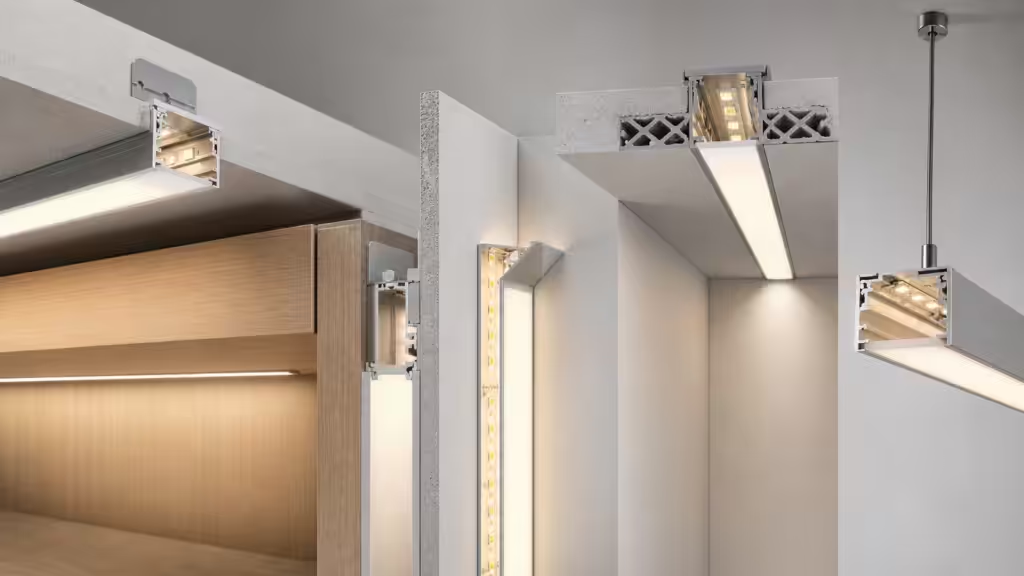
Quick answer: which LED aluminium profile should you choose?
Start with the installation surface and the direction of light. Then eliminate any profile that cannot fit the strip, solder joints, connector, cable exit, and diffuser.
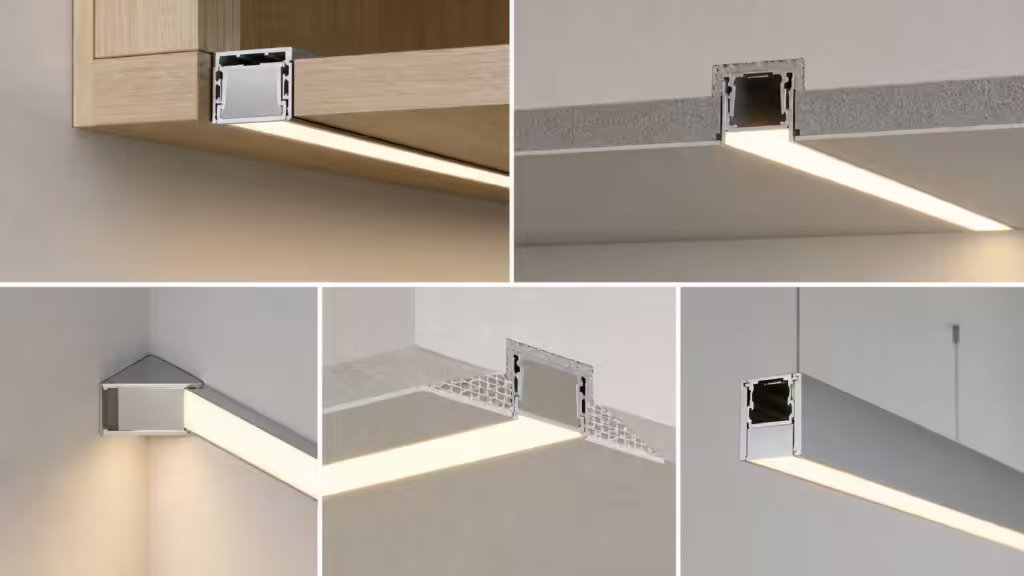
| Profile type | Best use | Main advantage | Check before buying |
|---|---|---|---|
| Surface-mounted | Cabinets, shelves, ceilings, furniture | Fast installation and easy service | Clip spacing, screw clearance, and visible height |
| Recessed | Millwork, ceilings, walls, display cases | Flush, built-in appearance | Groove width, flange coverage, and material depth |
| Corner | Under cabinets, coves, display corners | Directs light away from the mounting plane | Beam direction and door or shelf clearance |
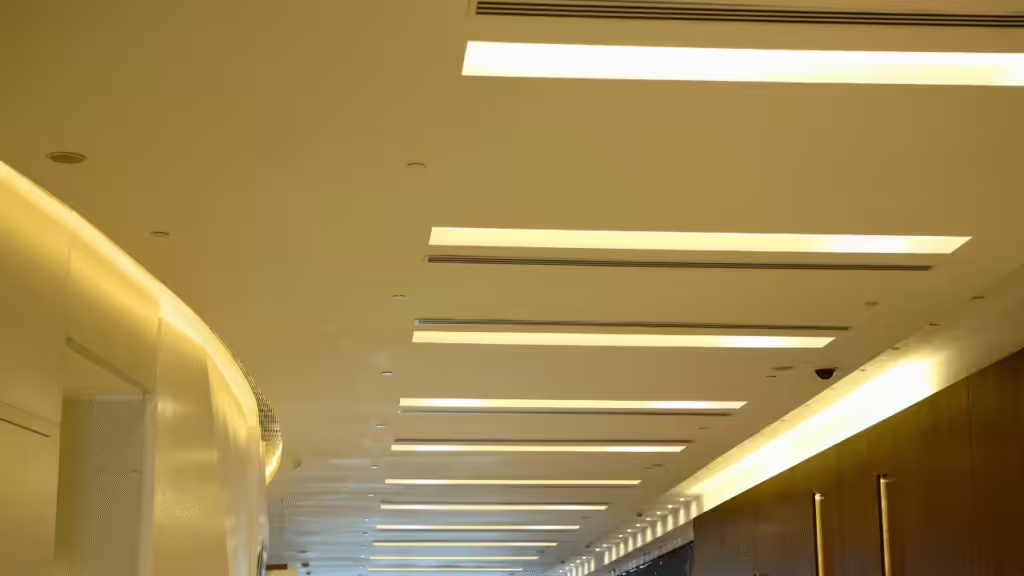
| Plaster-in or trimless | Drywall and architectural details | Seamless finished edge | Installation sequence, finishing protection, and service access |
| Suspended | Linear pendants and work lighting | Light can become a structural feature | Suspension points, power feed, straightness, and glare |
| Floor or stair profile | Steps, paths, and edge lighting | Mechanical protection and visual guidance | Load rating, slip resistance, ingress protection, and code requirements |
Do not select from that table alone. Two surface profiles may look almost identical while having different internal channel widths, base thicknesses, diffuser systems, and thermal behavior.
A professional specification answers five questions:
- Fit: Does the complete strip assembly fit inside the channel?
- Heat: Can the profile keep the strip within its allowed temperature at the real ambient and duty cycle?
- Optics: Does the profile and diffuser create the required beam and hide LED dots?
- Environment: Can the complete assembly handle dust, moisture, cleaning chemicals, touch, and impact?
- Service: Can someone replace the strip, diffuser, cable, or driver without rebuilding the ceiling?
Notice that “looks sleek” did not make the top five. It still matters. It just has to wait until the electrons and screw heads have somewhere to live.
What does an LED aluminium profile actually do?
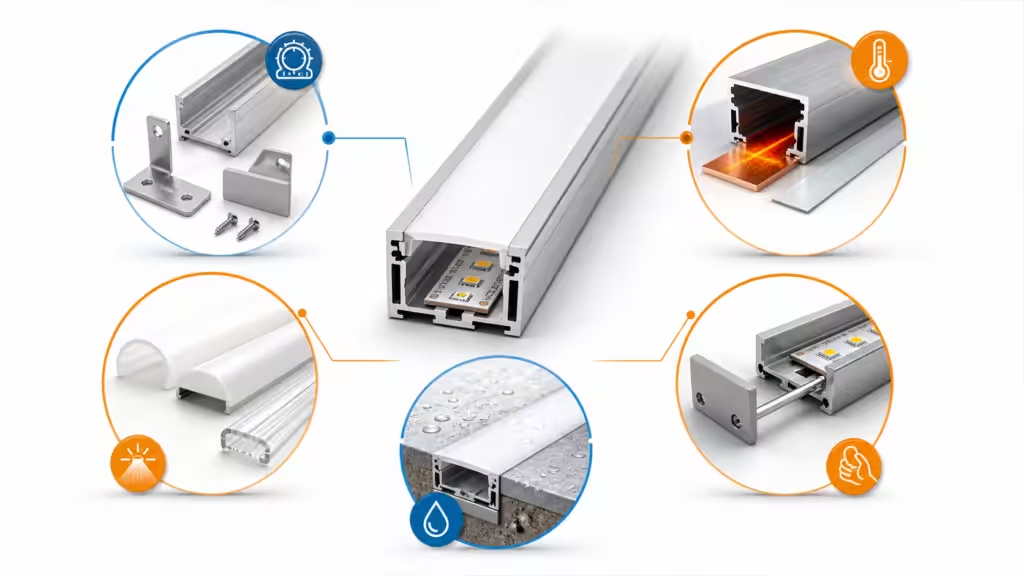
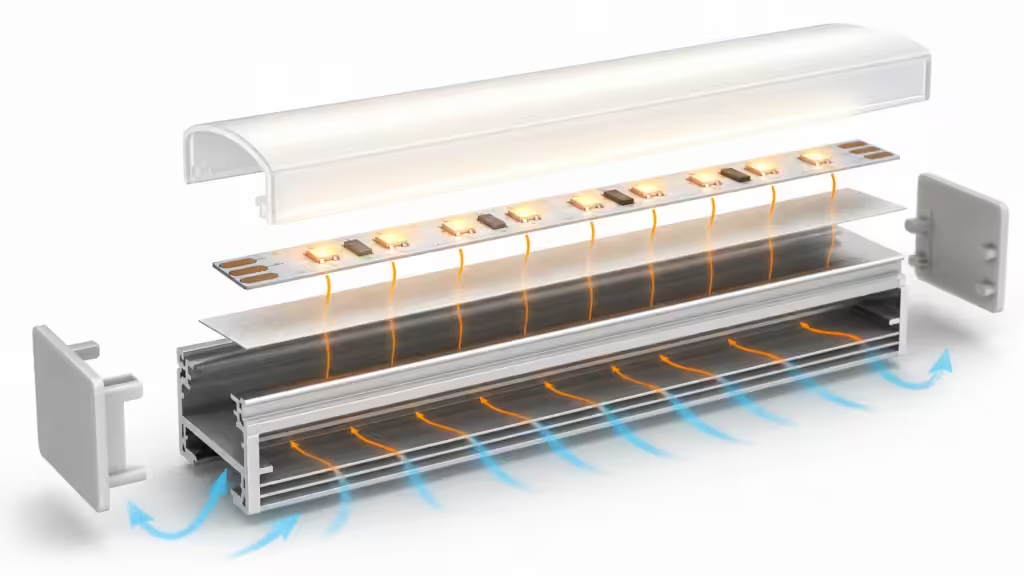
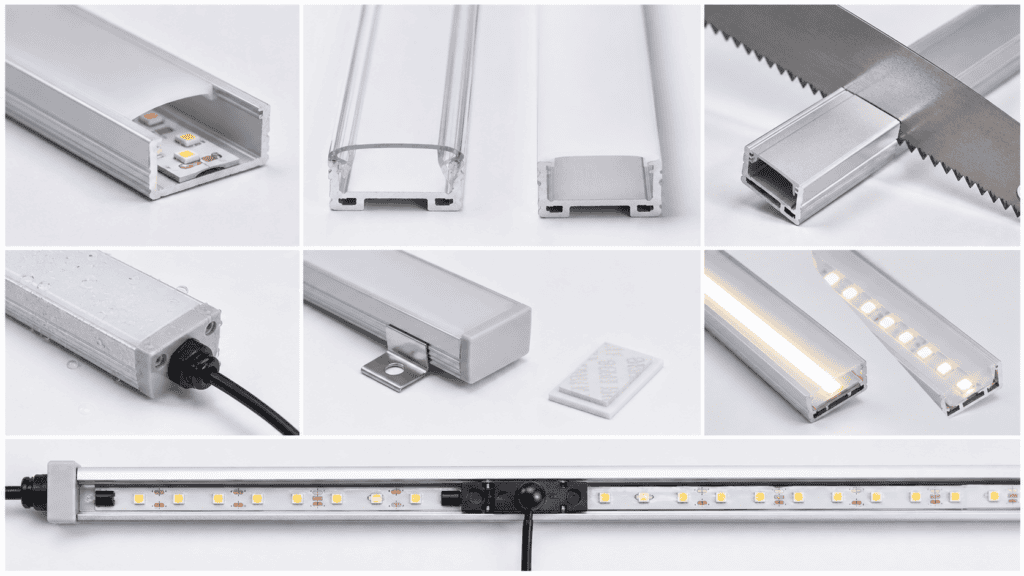
An LED aluminium profile, also called an LED aluminum channel or extrusion, is a metal housing for flexible or rigid LED strips. Most systems add a snap-in or slide-in diffuser, end caps, mounting clips, and sometimes suspension hardware.
It spreads heat
LEDs convert part of their electrical input into heat. That heat travels through the strip’s circuit board and adhesive layer into the aluminium base, then spreads along the profile and leaves through convection and radiation.
The simplified thermal path is:
LED junction -> strip PCB -> adhesive interface -> aluminium profile -> surrounding air
Every interface adds resistance. A thick, soft adhesive layer with trapped air can spoil the benefit of a large channel. The profile cannot collect heat that never reaches it.
Our own thermal hardware work illustrates why system conditions matter. We use Ansys for mechanical analysis, Fluent for fluid behavior, and Flotherm for thermal simulation. That optimized workflow has shortened development cycles by 50%. The lesson for LED profiles is practical: profile shape alone does not determine temperature. Contact quality, power, local ambient, enclosure, orientation, and airflow all participate in the result.
For a deeper explanation of conduction, convection, and thermal resistance, see Aluminum Heatsinks: Types, Function, and Efficiency Explained.
It protects the strip
The channel shields the circuit board from casual contact, cleaning tools, small impacts, and sharp bends. A diffuser also keeps fingers and objects away from exposed LEDs and solder joints.
This protection has limits. A standard open-backed profile does not become waterproof because it is made of aluminium. Outdoor or wet-location performance depends on the complete system: strip construction, lens seal, end caps, cable glands, joints, drainage, mounting orientation, and the supplier’s tested ingress rating.
It controls the light
Profile angle and diffuser geometry shape the visible output. A clear lens preserves more punch but reveals LED points. An opal lens improves diffusion but reduces output. A deeper channel gives light more distance to blend before it reaches the diffuser.
COB strips often produce a smoother line in shallow profiles because their emitters are closely packed. SMD strips may need more depth, a denser LED pitch, or a more diffusing lens. Do a sample test. Catalog photography is talented, but it does not know your countertop reflectance.
How to choose the right LED aluminium profile
1. Measure the LED strip at its widest real point
Use the profile’s internal channel width, not its outside width. Measure the strip with calipers and include manufacturing tolerance.
Then measure the parts that product photos politely ignore:
- Solder beads at cut points
- Clip-on connectors
- Wire insulation and bend radius
- Waterproof sleeves or silicone coatings
- Side-emitting components
- Any rigid joiner used between strip sections
A nominal 10 mm strip may become wider at the connector or solder joint. If the channel only fits the bare PCB, assembly becomes a small metal puzzle with expensive lighting attached.
Also check internal depth. The strip, connector, and cable must clear the diffuser without pushing it upward. For recessed profiles, confirm both the body width and the flange width. The body fits the groove; the flange hides the cut edge.
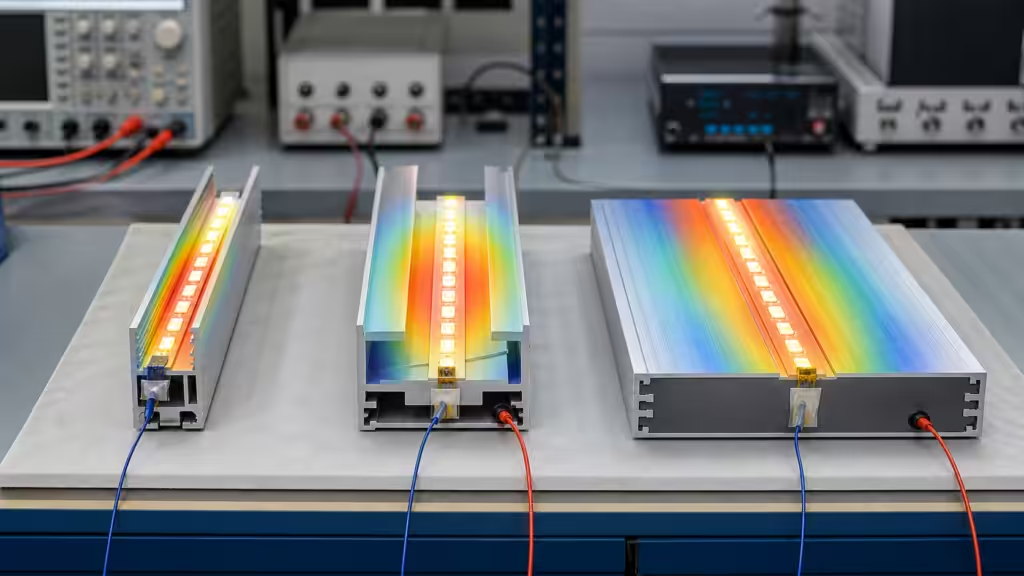
2. Match profile mass and surface area to the heat load
Do not use one universal watt-per-meter rule. LED strip construction, copper weight, efficiency, current, ambient temperature, duty cycle, profile geometry, mounting surface, and airflow vary too much.
Instead, collect these inputs:
- Input power per meter at the chosen voltage and dimming level
- Total illuminated length
- Expected room or enclosure temperature
- Daily duty cycle
- Whether the channel is open to air or trapped in insulation or millwork
- Maximum allowed strip or LED case temperature from the strip supplier
- Whether the mounting surface can absorb or trap heat
For a high-power run, choose a wider or deeper profile with more aluminium and exposed surface. Avoid enclosing it in a tight unventilated cavity. If the strip must run near full output for long periods, validate a sample at the worst expected ambient.
Temperature should be measured after the assembly reaches a stable condition. A thermocouple bonded near the LED or on the strip PCB is usually more trustworthy than pointing an infrared thermometer at shiny aluminium. Reflective metal can turn a quick temperature check into interpretive art.
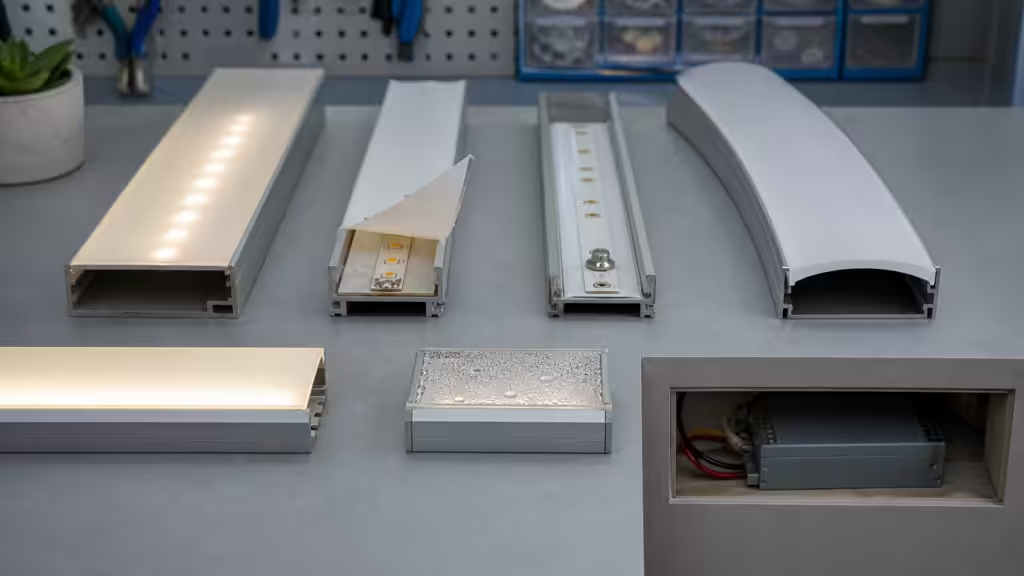
3. Choose the diffuser and channel depth together
The diffuser affects appearance, output, glare, and dot visibility. Treat it as part of the optical design, not a decorative lid.
| Diffuser type | Typical result | Trade-off |
|---|---|---|
| Clear | Highest visual punch and defined beam | LED points and wiring are easier to see |
| Frosted | Balanced diffusion and output | Some dotting may remain in shallow profiles |
| Opal | Smoothest line and lower glare | More light loss |
| Black or smoked | Dark appearance when off | Lower output and greater thermal sensitivity may require testing |
The distance between the emitters and diffuser matters as much as the diffuser label. Test the actual strip, profile, lens, surface color, viewing angle, and dimming level. A sample one meter long can prevent a hundred meters of beautifully consistent disappointment.
4. Select the mounting geometry and beam direction
Use a surface profile when access and speed matter. Use recessed profiles when the channel can be planned into the substrate. Use a corner profile when the beam must leave at an angle, such as under a wall cabinet or inside a display case.
For corner profiles, check where the diffuser faces after installation. A nominal angle does not guarantee the same useful beam on every surface because diffuser curvature and mounting position differ.
For plaster-in profiles, coordinate the channel before drywall finishing. Protect the diffuser groove from compound and paint. Also plan how the strip and driver will be serviced. “Permanent” lighting often means “someone else will curse this detail later.”
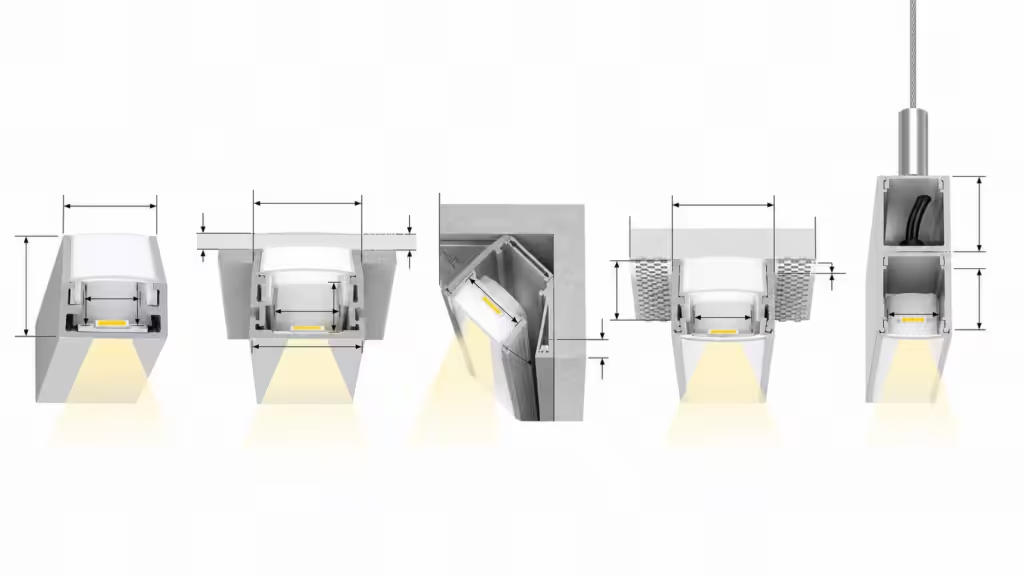
5. Check the environment and the complete protection system
For a dry cabinet, a standard channel may be enough. Kitchens, bathrooms, storefronts, refrigerated displays, exterior signs, floors, and stairs require more questions.
Check:
- Required ingress rating for the complete luminaire
- Exposure to condensation, steam, rain, or washdown
- UV resistance of the diffuser and sealants
- Cleaning chemicals and abrasion
- Salt or corrosive environments
- Impact, foot traffic, and load requirements
- Drainage paths and cable entry direction
- Local electrical and building codes
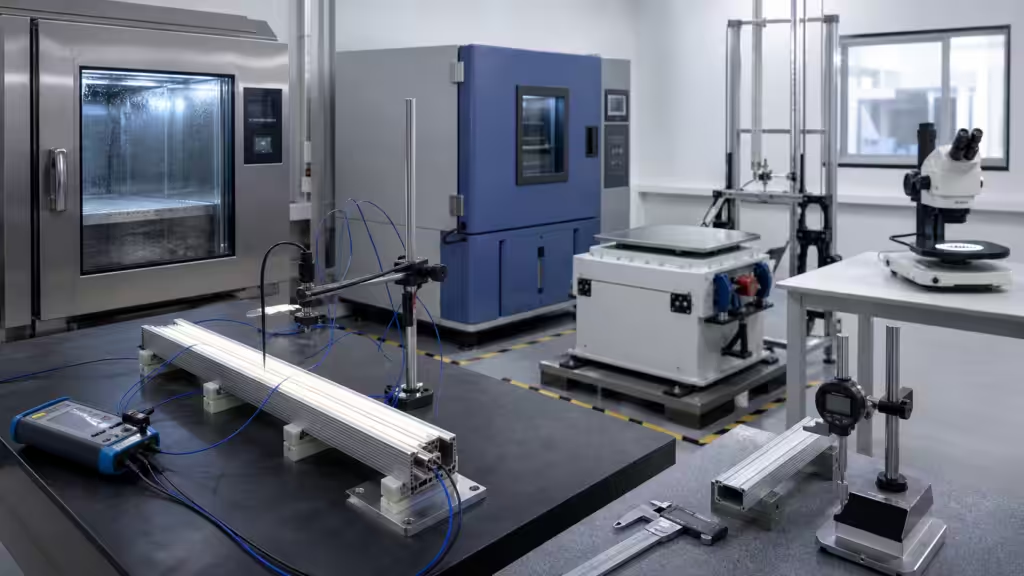
Our environmental validation work includes humidity, rapid temperature change, thermal shock, vibration, high-temperature aging, and salt-spray testing. A residential shelf does not need an automotive qualification program. A commercial luminaire sold into harsh environments may need more than a confident end cap and a bead of sealant.
6. Plan the finish, length, joints, and expansion
Common finishes include natural anodized, black anodized, white coated, and custom colors. Anodizing improves surface durability and gives a consistent appearance, but exact color and gloss can vary by alloy, batch, process, and viewing condition.
Extrusion is well suited to long constant profiles. Our manufacturing catalog specifies A6063 for extruded thermal products, with standard and custom options and custom anodize colors. It also notes that extrusion is suitable for high-volume production with low non-recurring engineering cost and is most cost-effective when heavy post-machining is not required.
For long architectural runs, plan joints instead of pretending one profile can ignore transport, building movement, and thermal expansion. Stagger the profile and diffuser joints when the system allows it, keep gaps consistent, and follow the supplier’s expansion guidance.
7. Design for wiring and maintenance
Decide where power enters, where voltage drop is managed, and where drivers live before cutting the profile.
The driver needs the correct rating, ventilation, electrical enclosure, and service access. Long runs may need power injection or multiple feeds. Use the strip and driver supplier’s limits for run length, conductor size, current, and dimming compatibility.
Leave room for cable exits without pinching insulation under the diffuser or end cap. A perfectly straight light line loses some charm when its wire exits through a hand-cut notch with ambitions of becoming a knife.
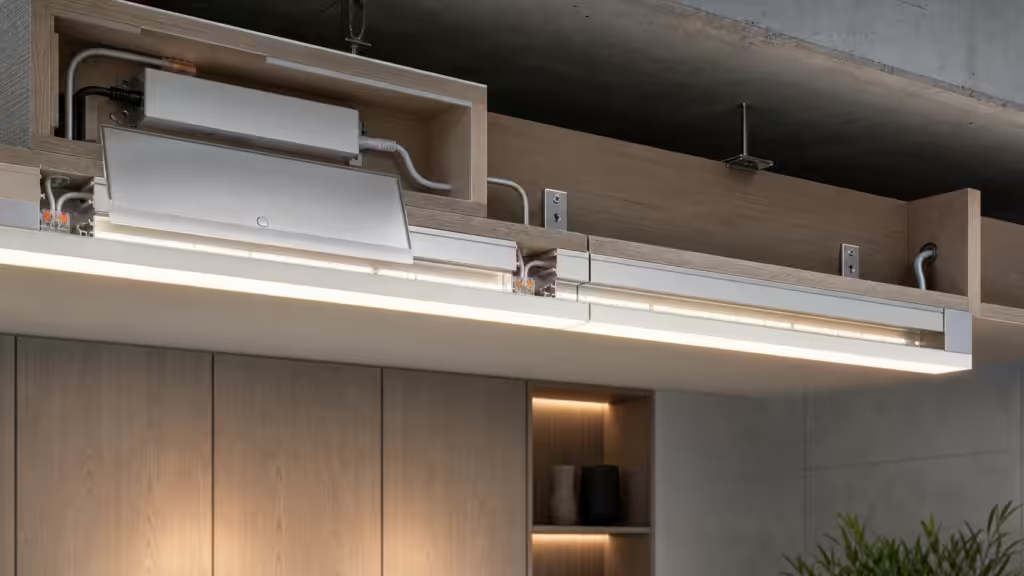
How to measure and specify the profile before ordering
Build a small specification sheet for each run. Record the following:
| Item | What to record |
|---|---|
| Strip | Brand, model, voltage, watts per meter, PCB width, cut interval, IP construction |
| Profile | Type, internal width and depth, external size, base thickness, finish, length |
| Diffuser | Clear, frosted, opal, smoked, snap-in or slide-in |
| Mounting | Clips, screws, adhesive, recessed flange, suspension kit |
| Wiring | Feed location, connector size, solder joint size, cable route, power injection |
| Driver | Output voltage, load margin, dimming method, enclosure, ventilation, access |
| Environment | Ambient range, moisture, UV, impact, cleaning, required rating |
| Service | How to remove diffuser, strip, driver, and end caps later |
Before ordering the full quantity, assemble a sample with the exact strip and diffuser. Check fit, dot visibility, glare, color shift, clip force, wire routing, and temperature.
For custom commercial products, our engineering workflow pairs simulation with physical testing. The lab behind that workflow includes 58 sets of professional test equipment, 2,000 square meters of test space, and a 10-person test team. That scale is not required to install a wardrobe light, but the sequence still applies: define conditions, build a representative sample, measure it, then approve the design.
Tools and materials for a clean installation
The exact tool list depends on the profile and substrate, but a typical installation uses:
- Tape measure, square, pencil, and calipers
- Fine-tooth saw or suitable non-ferrous cutting blade
- Miter box or guided saw for straight and angled cuts
- Fine file and deburring tool
- Drill, bits, countersink, screws, and anchors matched to the substrate
- Profile clips or approved structural adhesive
- Isopropyl alcohol and lint-free wipes for compatible surfaces
- Soldering tools or approved strip connectors
- Wire stripper, conductors, heat-shrink tubing, and cable glands as required
- Multimeter and the correct LED driver
- Eye protection and cut-resistant handling gloves
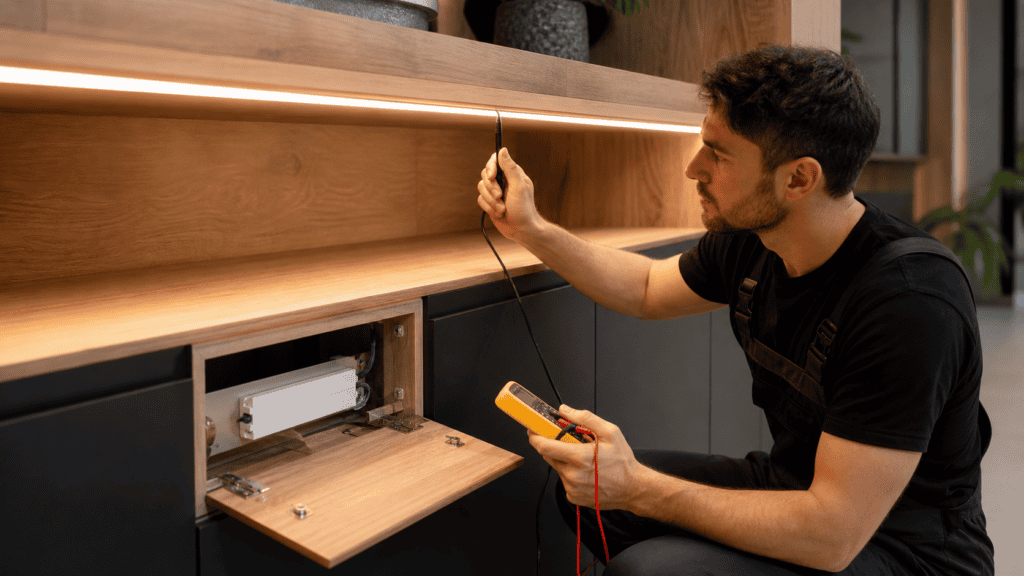
Disconnect power before wiring. Mains-side driver work and permanent building wiring should follow local code and may require a qualified electrician.
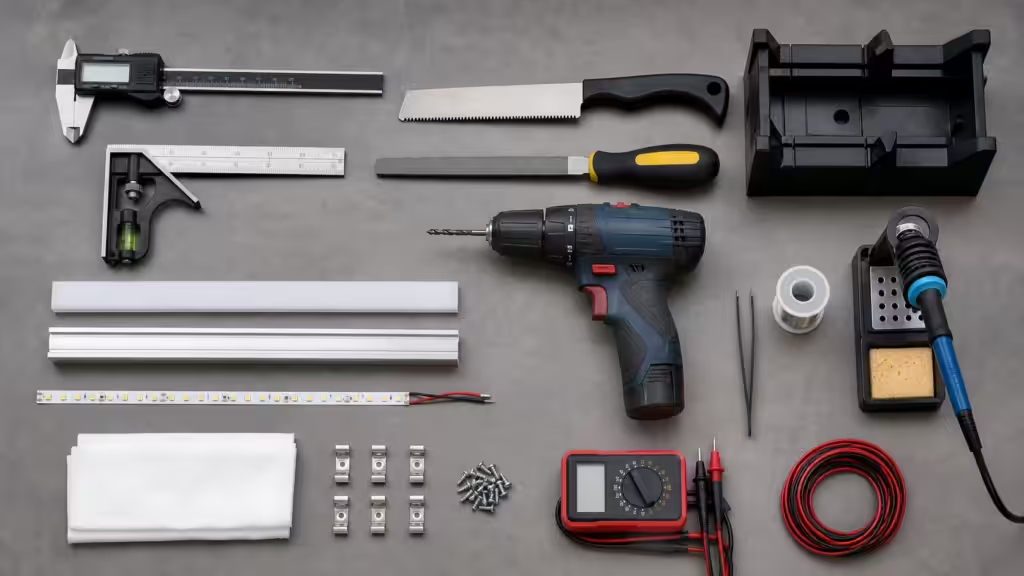
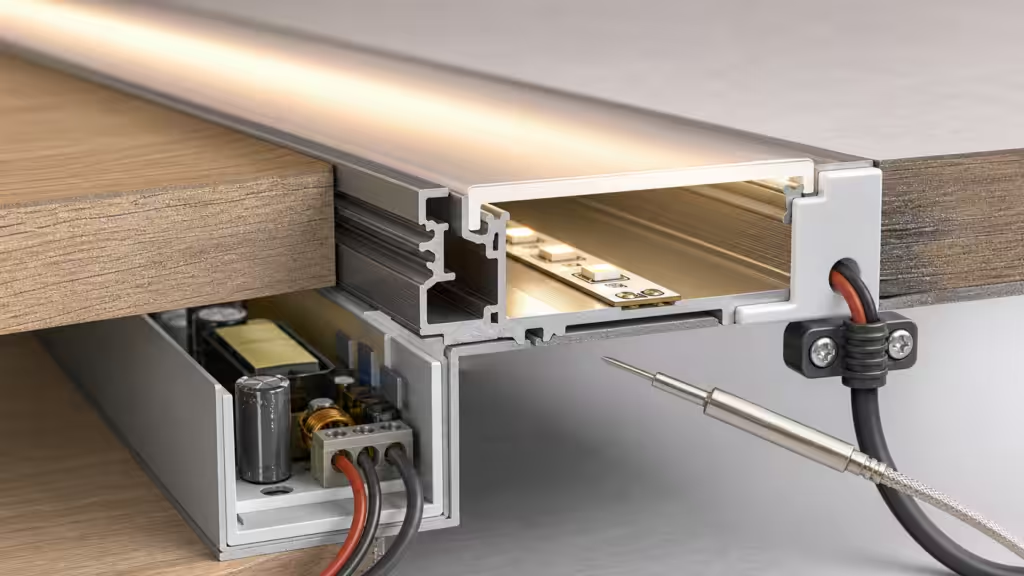
How to install LED aluminium profiles step by step
Step 1: Dry-fit the complete system
Place the uncut profile, diffuser, end caps, clips, strip, connector, and cable in their intended positions. Confirm door swings, shelf clearance, reflected glare, cable routes, and driver access.
Power a short sample if possible. Check the light from normal eye level, not only while standing six inches from the diffuser like a very focused moth inspector.
Step 2: Mark cut length and hardware positions
Measure the opening at more than one point. Walls, cabinets, and ceilings often disagree with CAD by just enough to be interesting.
Mark the profile and diffuser separately. Account for end caps, corner connectors, feeds, and expansion instructions. Mark clip or screw positions on a straight reference line.
Step 3: Cut the aluminium profile
Support the channel so it cannot twist. Use a fine-tooth blade suitable for aluminium and make a controlled square or miter cut. Keep the diffuser out of the profile while cutting unless the supplier specifically recommends otherwise.
Cut slowly enough to avoid tearing thin flanges. Remove chips before they reach the LED strip or diffuser groove.
Step 4: Cut the diffuser
Diffuser materials can crack, chip, or melt under the wrong blade speed and support. Leave any protective film in place during cutting. Support both sides of the cut and follow the supplier’s method for that lens material.
Test-fit the cut diffuser. It should seat without bowing or forcing the profile apart.
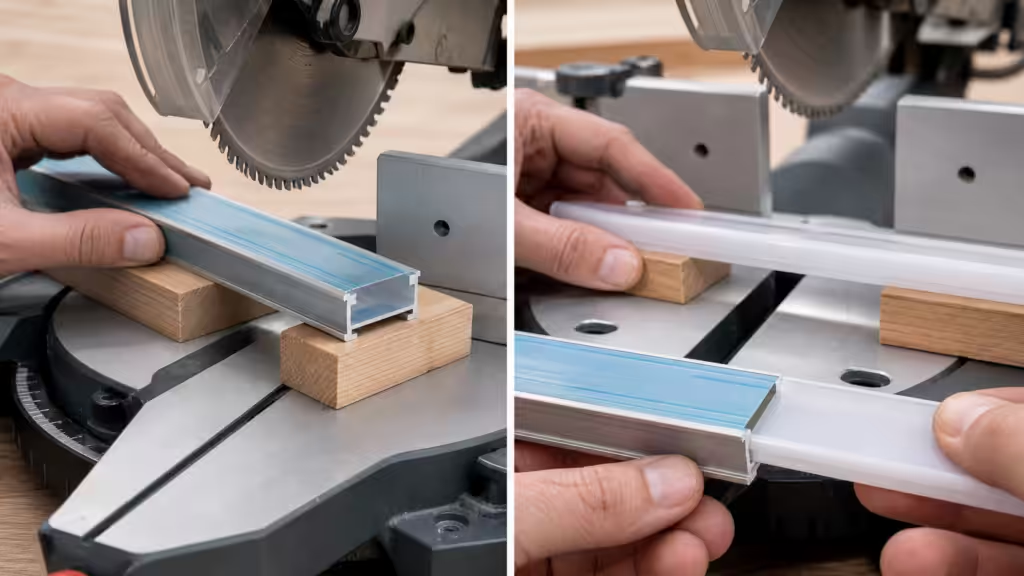
Step 5: Deburr and clean
File every cut edge. Pay special attention to cable notches, screw holes, and the channel base. A burr can damage insulation, hold the strip above the base, or create a visible gap at an end cap.
Vacuum or wipe away metal chips. Clean the profile base with a compatible solvent and a lint-free cloth. Let it dry fully before applying adhesive-backed strip.
3M’s official VHB surface preparation guidance emphasizes clean, dry, well-prepared surfaces. The exact adhesive on your LED strip may differ, so follow its supplier’s cleaning and compatibility instructions.
Step 6: Mount the empty profile
Install the channel before the LED strip. This prevents drill swarf, screwdrivers, and wandering saw blades from meeting the circuit board.
For clips, align them carefully and space them according to the profile supplier. Too few clips allow sagging or a wavy light line. Clips also need room to release if the profile will be serviced.
For screws, use holes or countersinks that keep the head below the strip plane. Do not distort the base by overtightening. Use anchors matched to drywall, masonry, wood, or metal.
For adhesive mounting, confirm that the bond is rated for the profile mass, operating temperature, surface energy, environment, and expected load. Apply the specified pressure. Adhesive is an engineered joint, not optimism on a roll.

Step 7: Install the LED strip with full base contact
Test the strip before bonding. Confirm polarity, color, dimming, and every segment.
Peel a short section of backing at a time. Center the strip in the profile and press it down progressively without stretching the PCB. Apply firm, even pressure along the bond line. Do not touch the adhesive more than necessary.
Keep solder joints low and smooth. If a joint lifts the strip from the base, heat must cross an air gap before reaching the aluminium. For high-power custom luminaires, the thermal interface may need engineering beyond ordinary strip tape.
Our materials work includes pads rated at least 18 W/mK in 1-7 mm thickness with Shore 00 hardness of 50, gel rated at least 16 W/mK, and grease rated at least 7 W/mK. Those figures show why conductivity is only one selection variable. Thickness, hardness, compression, electrical insulation, dispensing, rework, and long-term stability also matter. They are not a recommendation to smear thermal grease under a standard LED tape.
Step 8: Complete wiring and strain relief
Route wires through deburred exits. Protect them from sharp edges and provide strain relief where movement is possible. Observe polarity and do not exceed strip, connector, cable, or driver current ratings.
For long runs, verify voltage at the far end under load. Correct unacceptable voltage drop with the manufacturer’s approved run length, conductor size, power-injection, or multi-feed strategy.
Keep mains wiring separated and enclosed as required. Place the driver where it can dissipate heat and be replaced. Hiding it behind permanently tiled millwork is less installation and more time capsule.
Step 9: Fit the diffuser and end caps
Remove protective film only when dusty work is complete. Snap or slide the diffuser into place using the supplier’s method. Work evenly to avoid stress marks and waves.
Fit end caps without pinching conductors. If the system requires environmental sealing, use the specified seals, glands, adhesives, and cure process. Verify the rating of the complete assembly rather than assuming each component donates its rating to the group.
Step 10: Test light, temperature, and service access
Run the complete installation at its intended maximum load. Check every segment, dimming level, joint, feed point, diffuser seam, and reflected surface.
Measure temperature under the worst realistic ambient and operating duration. Also remove one diffuser and access the driver as a service trial. A design that works only before the ceiling is finished has passed the wrong test.
Installation notes by profile type
Surface-mounted LED profile
Snap a chalk or laser line, mount clips or drill the profile, then verify straightness before installing the strip. On uneven wood or plaster, shims may be better than forcing the aluminium to follow every dip.
Surface profiles are the easiest to service. They also reveal alignment errors, so check the line from the normal viewing direction before final wiring.
Recessed LED profile
Cut a groove wide and deep enough for the body, cable, and any mounting adhesive. The flanges should cover the edge without rocking on high spots.
Dry-fit before finishing the substrate. Do not let screws, glue, or filler intrude into the diffuser track. Where heat is a concern, avoid wrapping the profile in insulating material unless the system was designed and tested that way.
Corner LED profile
Mount both ends first, confirm beam direction, then align the intermediate clips. Check cabinet doors, hinges, shelf contents, and the user’s normal eye line.
Corner profiles are useful for reducing direct glare, but the wrong angle can place a bright reflection on polished stone or glass. Test after dark and in daylight.
Plaster-in or trimless profile
Install the extrusion during the board and plaster sequence. Keep the channel straight, protect the diffuser groove, and use finishing methods approved for the profile’s flange.
Plan replaceable components outside the finished surface. A trimless edge should look permanent. The driver should not be.
Suspended linear profile
Confirm suspension load, spacing, electrical feed, torsion, and level. Long profiles can show slight bow or twist, especially when suspension points are uneven.
Use hardware supplied or approved for the system. Any luminaire over occupied space also needs the safety provisions required by local code.
Common LED profile mistakes and how to fix them
| Symptom | Likely cause | Corrective action |
|---|---|---|
| Strip will not sit flat | Channel too narrow, raised solder joints, debris, or screw heads | Deburr and clean; use low joints and recessed hardware; select a wider profile |
| LED dots are visible | Shallow channel, low LED density, or clear diffuser | Test a deeper profile, denser strip, COB strip, or more diffusing lens |
| Strip peels away | Poor cleaning, incompatible adhesive, low pressure, heat, or uneven base | Prepare the surface correctly and use an approved bonding method |
| Profile feels too hot | Excess power, poor contact, trapped ambient, undersized profile, or failed driver control | Reduce load, improve contact or ventilation, use a larger profile, and test temperature |
| Light is dim at the far end | Voltage drop or excessive run length | Follow supplier limits; increase conductor size or add approved power feeds |
| Diffuser bows or pops out | Wrong cut length, heat expansion, damaged groove, or incompatible lens | Recut to supplier allowance and replace damaged or mismatched parts |
| Recessed channel looks uneven | Groove varies or flange sits on debris and high spots | Correct the groove and dry-fit before bonding or finishing |
| Moisture appears inside | Incomplete sealing, condensation, poor cable entry, or no drainage | Rework the full rated assembly and manage condensation and drainage |
| Radio or dimming issues occur | Driver mismatch, wiring layout, or control compatibility | Verify driver, dimmer, load, cable, and control requirements as one system |
| Driver cannot be replaced | Access was not planned | Add an accessible enclosure or service opening before final finish |
The most expensive mistake is ordering the whole project before testing one representative run. A sample should include the longest cable path, actual driver and dimmer, exact profile and diffuser, real mounting surface, and worst viewing angle.
When should you order a custom LED aluminium profile?
A standard profile is usually best for one-off installations and modest volumes. Choose custom extrusion when the product needs a repeated cross-section that standard channels cannot provide.
Good custom-profile reasons include:
- A unique strip, optic, lens, or PCB width
- Integrated screw bosses, cable channels, clip features, or heat-spreading fins
- A housing that combines lighting, structure, and thermal management
- A controlled finish or brand-specific exterior
- Long production runs that can distribute tooling cost
- Reduced part count or assembly operations
The Aluminum Extruders Council’s LED white paper describes 6063 as a common alloy for LED fixtures. It also shows how extrusion can integrate cooling fins, housing features, machining, forming, and anodizing into one product architecture.
Our own catalog reaches the same manufacturing conclusion from electronics cooling: A6063 extrusion suits high-volume production with low NRE, and its economics are strongest when post-machining stays limited. CNC machining still helps with prototypes, holes, slots, end features, and low-to-medium volume variants. The trick is to let the extrusion create most of the geometry.
Before committing to tooling, review:
- Alloy and temper
- Wall and base thickness
- Flatness, straightness, and twist
- Internal channels and die tongue strength
- Cut-length tolerance
- Machined features and datum strategy
- Anodize or coating requirements
- Diffuser and end-cap tolerances
- Thermal model and physical validation plan
- Packaging that prevents long profiles from bending or scratching
This is where simulation earns its coffee. Model the profile, strip, ambient, mounting surface, and airflow before optimizing a fin nobody can extrude or a groove nobody can assemble.

How professionals validate a commercial LED profile design
For a single indoor shelf, a careful sample and temperature check may be enough. For a luminaire sold at scale, validation should reflect how and where the product will live.
Our test capability covers thermal resistance and flow, mechanical performance, failure analysis, rapid temperature change, thermal shock, humidity, random vibration, high-temperature aging, and salt spray. The lab supports new product design validation, material analysis, process validation, periodic production checks, and customer technical support.
Our larger automotive thermal programs use APQP gates. They move from sample validation and PPAP approval through pilot and mass production. An LED profile does not need to borrow every automotive document. A commercial lighting program still benefits from the same rule: a hand-built prototype is evidence, not production approval.
A practical LED profile validation plan may include:
- Dimensional fit: Verify strip, lens, end caps, connectors, cables, clips, and machining across tolerances.
- Thermal test: Run at maximum rated load and worst ambient until temperature stabilizes.
- Optical review: Check output, diffusion, glare, color consistency, and dot visibility.
- Electrical test: Verify voltage drop, current, dimming, insulation, grounding, and protection requirements.
- Mechanical test: Check clip retention, suspension, impact, cable strain, and service cycles.
- Environmental test: Select humidity, UV, corrosion, vibration, temperature cycling, or ingress tests that match the use case.
- Production check: Confirm that cutting, deburring, bonding, wiring, and inspection are repeatable.
That last step matters. A prototype built by the senior engineer may be lovely. The product must also survive normal tools, normal hands, and a Monday morning production schedule.
FAQ about LED aluminium profiles
Do all LED strips need an aluminium profile?
No. Low-power decorative strips used briefly in a cool, protected location may work without one if the strip supplier allows it. Profiles become more valuable as power, duty cycle, visibility, touch risk, or mechanical exposure increases.
How wide should an LED aluminium profile be?
Choose an internal channel wider than the strip’s widest assembled point, including solder joints, connectors, coatings, and tolerance. Check depth and diffuser clearance too. Outside width alone does not prove compatibility.
Can I cut an LED aluminium profile with a hand saw?
Yes, if you use a suitable fine-tooth blade, support the profile, control the cut, and deburr it thoroughly. A miter box or guide improves accuracy. Cut the diffuser according to its own material requirements.
Is an LED aluminium profile waterproof?
Not by itself. Waterproof or wet-location performance belongs to the complete tested assembly, including strip, diffuser seal, end caps, cable entries, joints, mounting orientation, and drainage.
Should I use a clear or opal diffuser?
Use clear when output and a defined beam matter more than visible LED points. Use opal when a smooth line and lower glare matter more than maximum output. Test the exact strip and profile because depth and LED pitch change the result.
Can I mount an LED profile with adhesive only?
Sometimes, but the adhesive joint must be rated for the substrate, profile mass, temperature, environment, and expected load. Clean the surface and apply the specified pressure. Use mechanical fasteners where failure could create a safety risk.
Is COB strip always better for shallow profiles?
COB strip often creates a smoother line at shallow depth, but “better” also depends on efficacy, color quality, power, bend limits, repair, cost, and the diffuser. Compare samples under real viewing conditions.
How hot is too hot for an LED profile?
The profile surface does not have one universal limit. Use the LED strip, adhesive, diffuser, driver, and luminaire component ratings. Measure the critical strip or LED temperature under worst-case operation, not just the room temperature.
Final checklist before switching on
- The strip, solder joints, connectors, and wires fit without pressure from the diffuser.
- The profile is straight, secure, deburred, and free of metal chips.
- The strip base has continuous contact with the clean aluminium channel.
- The driver, dimmer, voltage, current, cable size, and run length are compatible.
- Cable exits have edge protection and strain relief.
- The diffuser seats evenly and can be removed for service.
- Wet or outdoor assemblies use a complete verified protection system.
- The longest representative run has passed light, voltage-drop, dimming, and temperature tests.
- The driver remains ventilated and accessible.
Choosing an LED aluminium profile is not about finding the narrowest channel that can swallow the strip. It is about creating a reliable thermal, optical, mechanical, and electrical system.
Start with a full-size sample. Measure the parts that actually arrive, install them with the intended tools, and test the longest worst-case run. When the job needs a custom profile, define the cross-section around fit and heat first, then let finish and aesthetics join the meeting.
For more detail on extrusion design and production trade-offs, read Why Extruded Aluminum Heat Sinks Outperform Others. If you are comparing profile geometries for precision cooling, see Top 10 Extruded Aluminum Heat Sinks for Precision Cooling.