
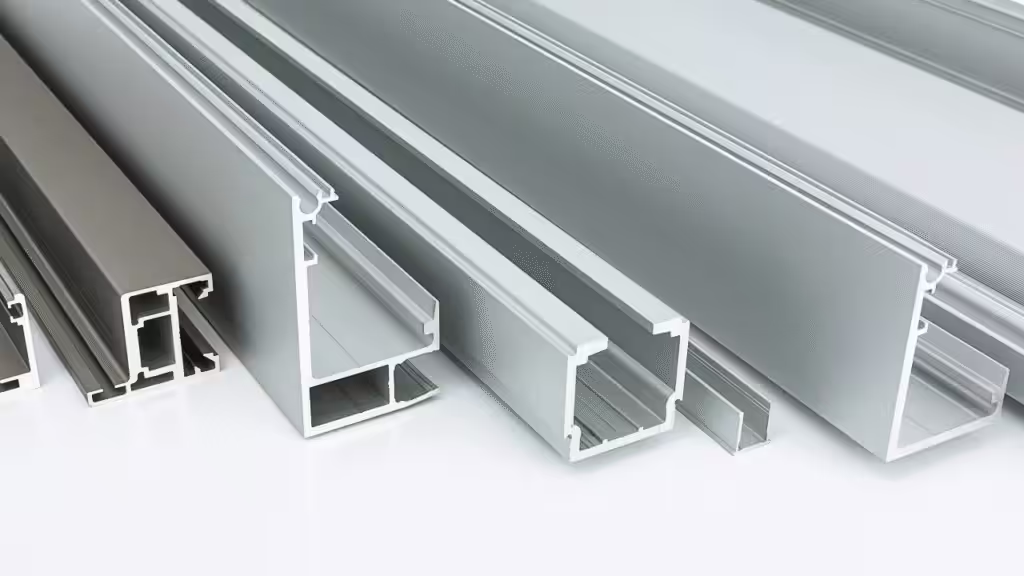
LED aluminum profiles turn flexible strip lights into straight, controlled lines. They can shape a ceiling, reveal a wall texture, illuminate a worktop, or guide someone down a stair. The aluminum channel hides the circuit, supports a diffuser, spreads heat, and gives the installer a stable mounting surface.
The expensive-looking part is rarely the strip itself. It is the coordination between profile depth, LED pitch, beam direction, finish, cable route, driver access, and the surfaces that receive the light. Ignore one of those details and the result may still glow, but so does a refrigerator at 2 a.m.
This guide covers 12 practical ways to use LED aluminum profiles in homes, retail spaces, hospitality interiors, and architectural features. It also explains how to keep the light smooth and the profile cool. The wiring stays serviceable, and custom work stays grounded in measured engineering rather than mood-board optimism.
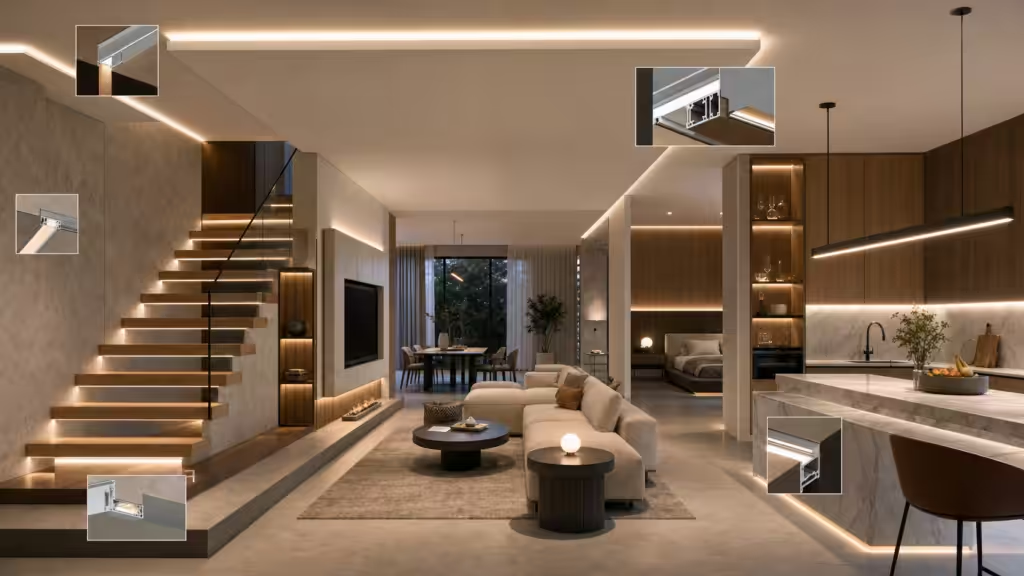
Quick answer: how do LED aluminum profiles transform a space?
LED aluminum profiles transform a space by turning flexible LED strips into controlled linear light. The profile hides the circuit, spreads heat, holds the diffuser, and gives the installer a straight reference. The best result comes from matching the profile to the lighting job, viewing angle, surface, environment, and service plan.
Start with what the light must do, not with whichever channel looks heroic in a catalog. A shallow surface profile can work well under a cabinet because the countertop receives the light. The same profile at eye level may expose every LED point and produce glare that makes the room feel like an interrogation scene.
| Lighting job | Typical spatial effect | Useful profile direction | Main design check |
|---|---|---|---|
| Ambient | Soft general brightness reflected from walls or ceilings | Cove, suspended, or deep recessed | Continuous output, reflected glare, and driver access |
| Task | Concentrated light on counters, desks, and work surfaces | Surface, recessed, or corner | Beam position, shadows, surface reflection, and heat load |
| Accent | Emphasis on shelves, materials, displays, or architectural edges | Slim recessed, angled, edge-lighting, or wall-grazing | Viewing angle, dot visibility, color quality, and aiming |
| Guidance | Visible route definition on stairs, floors, corridors, or handrails | Step, floor, handrail, or low-level recessed | Glare, impact, ingress protection, wiring, and local code |
Before selecting a profile, answer six questions:
- Where should the light land?
- Can a person see the diffuser directly?
- Does the strip, connector, cable, and solder joint fit inside the channel?
- Can the aluminum release heat into the surrounding air or mounting surface?
- Does the complete assembly suit dust, moisture, cleaning, and physical contact?
- Can someone replace the strip or driver after the cabinetry and ceiling are finished?
Those questions narrow the field faster than sorting profiles by outside width. They also prevent the classic lighting surprise: a perfect CAD line that requires dismantling half a wall to reach its power supply.
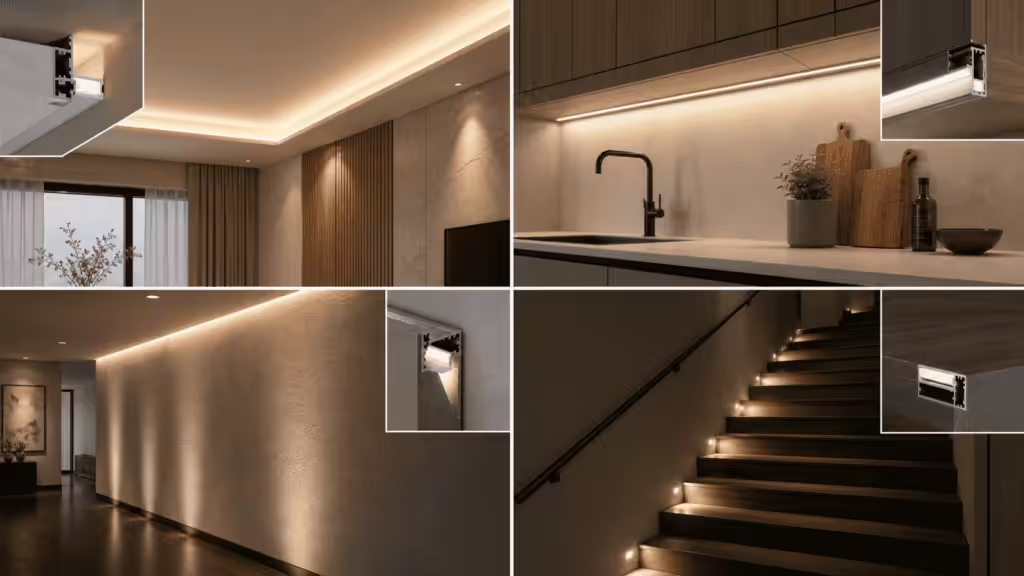
What makes an LED aluminum profile look and perform premium?
A premium LED aluminum profile is not simply thicker, shinier, or more expensive. It holds the strip without pinching it and keeps the diffuser seated. It also stays straight across joints, provides a useful thermal path, and leaves room for wiring and future service. Those details can be measured. The word “premium” on a product page cannot.
The light source disappears
Good linear lighting shows the effect before it shows the hardware. From normal eye level, the observer should see an even line or a controlled wash. Copper pads, solder joints, wires, and individual diodes should remain hidden.
Profile depth helps because it increases the distance between the emitters and the diffuser. That distance gives adjacent light cones more room to overlap. Depth alone cannot guarantee a dot-free line, though. LED pitch, which is the spacing between emitters, also matters. Emitter size, strip type, diffuser material, beam angle, dimming level, and viewing distance change the result too.
Test the exact strip and diffuser inside a representative profile. View the sample from seated and standing positions, with nearby surfaces finished in their real colors. A white quartz counter and a dark timber shelf do not return the same light, despite CAD treating both as politely neutral rectangles.
The illuminated line stays uniform
The profile and diffuser should remain straight without waves, loose sections, or local bulges over connectors. Check wall consistency, lens-groove geometry, clip retention, cut quality, and alignment between adjacent lengths. A diffuser that needs a wrestling match to install will be even less charming after the ceiling is finished.
Long runs need a joint plan. Keep gaps controlled, support both sides of each joint, and follow the supplier’s thermal-expansion guidance. Where the system allows it, staggering profile and diffuser joints can reduce the appearance of one continuous dark seam.
Uniformity also depends on the electronics. Mixed LED batches, uneven temperatures, and poor feed locations can cause color or brightness differences. Aluminum can spread heat. It cannot negotiate a peace treaty between mismatched LEDs.
The finish matches the architecture
Natural anodized aluminum works well when the channel may remain visible. Black can disappear against dark joinery or create a deliberate graphic line. White may blend into ceilings and pale cabinetry, but a near-white finish beside painted plaster can look more mismatched than bare metal.
Approve a physical finish sample beside the actual wall, timber, stone, or laminate. Check it with the lighting both on and off. Alloy, surface preparation, anodizing batch, coating thickness, gloss, and viewing direction can all affect the perceived color.
Our manufacturing catalog specifies Aluminum Alloy 6063 for standard and custom extruded thermal products and lists custom anodize colors. That gives custom lighting programs a practical material and finish path, but color approval still belongs to the project sample. The sample is where “champagne silver” stops being a poetic phrase and becomes a signed decision.
Heat, wiring, and maintenance remain under control
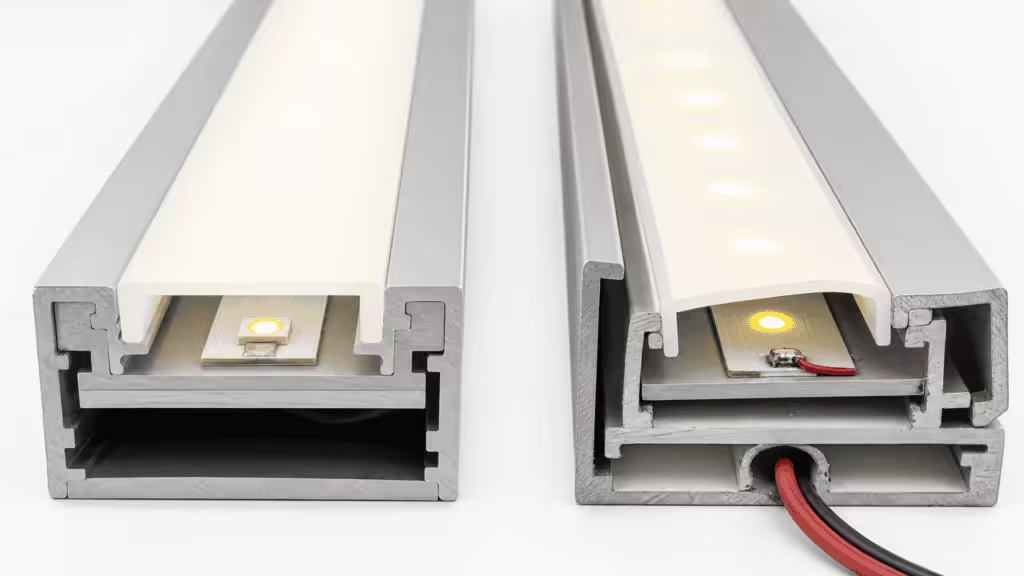
The aluminum channel can spread heat only when the strip contacts its base and the profile can release that heat to its surroundings. The basic path is LED -> strip PCB -> adhesive interface -> aluminum profile -> ambient air or mounting surface. Bubbles, debris, raised solder joints, thick unsuitable tape, and trapped installation cavities add resistance along that path.
The Aluminum Extruders Council’s LED lighting paper describes how extruded LED housings can combine structural features with integrated heat-sink geometry. In a slim architectural profile, the same principle applies at a smaller scale: geometry, contact, surface area, orientation, and surrounding air all affect temperature.
The channel must also fit cable bends, connectors, strain relief, end caps, and power-entry details without lifting the diffuser. Drivers and junctions need safe, code-compliant locations that remain accessible. A premium installation still feels premium when a technician opens it five years later and can replace a component without removing the millwork.
Choose the lighting job before choosing the profile
Choose the light’s job before choosing the channel shape. A narrow recessed profile, a corner profile, and a suspended profile can all hold the same strip. Each sends light into the room differently. Start with the target surface, viewing position, required brightness, mounting material, and service route.

Ambient lighting
Ambient lighting should make the room comfortable to move through without turning every ceiling edge into a visible light source. Cove profiles aim light at a ceiling or upper wall, where the surface becomes a large reflector. Suspended profiles can send light upward, downward, or both.
For a cove, test the setback from the wall and the distance below the ceiling. Too close and the surface may show a bright stripe. Too far and the light can spill into the room before it reaches the intended reflector. Dust access matters too. A cove that cannot be cleaned will eventually develop its own soft-focus filter.
Task lighting
Task lighting puts usable light on a counter, desk, shelf, or machine surface. Under a cabinet, moving the profile toward the front edge often reduces shadows cast by the user’s hands. A corner profile can aim the beam away from a vertical panel and toward the work area.
Check glossy countertops, polished stone, glass, and screens from the actual working position. These surfaces can reflect a bright line directly into the user’s eyes. A diffuser softens the source, but placement and aiming still do most of the work.
Accent and wall-grazing light
Accent lighting draws attention to an object or material. Wall grazing places the source close to a textured surface so small ridges cast visible shadows. Moving the profile farther away creates a broader, calmer wash.
Build a sample with the real brick, stone, timber, fabric, or plaster finish. Aiming that looks restrained on smooth drywall can make rough stone look like a lunar survey. The effect may be exactly what you want, but it should not be discovered after the last ceiling panel goes in.
Path and safety lighting
Low-level profiles can define stairs, corridors, ramps, and changes in floor level. The light should reveal the walking surface without shining into the eyes of someone moving up or down the path.
Profiles in steps, floors, and handrails face more contact than a shelf light. Specify mechanical load, slip resistance, impact protection, cable routing, cleaning exposure, and the required enclosure rating. Decorative light does not replace emergency lighting or code-required illumination.
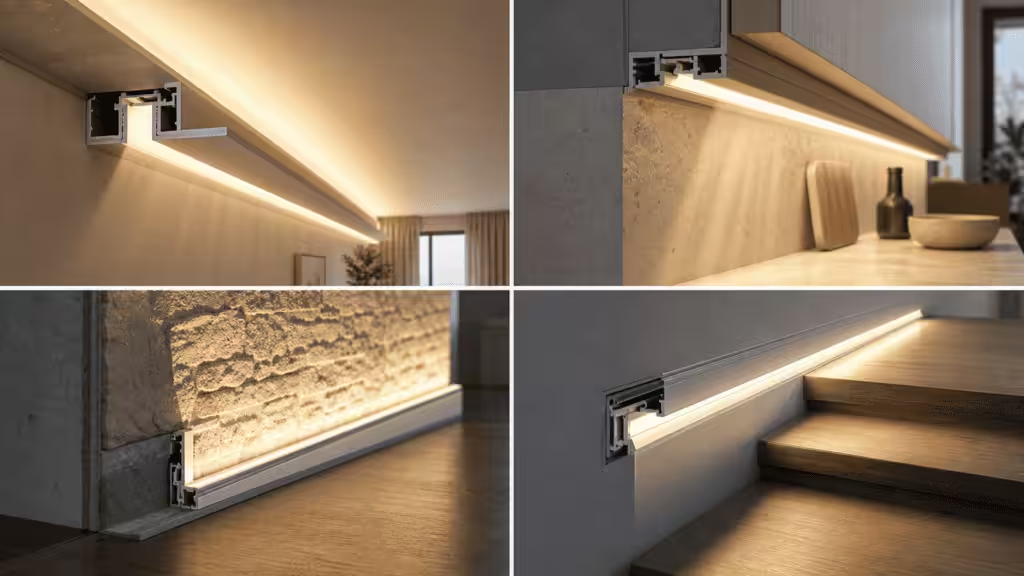
12 ways to transform a space with LED aluminum profiles
The following ideas begin with a spatial result, then work backward to profile geometry. None requires a rare strip or a theatrical product name. Most depend on careful placement, clean joints, and an electrical plan that exists before the saw comes out.
1. Under-cabinet task lighting
Use a slim surface or recessed profile to put a continuous line of light across a kitchen counter, workbench, or desk. Place the profile where the user’s body will not block the beam. Keep it outside the normal sightline from seated positions.
Route the cable through a deburred opening and keep the driver accessible inside a serviceable cabinet or adjacent void. Test the light against the real worktop. High-gloss stone can turn a neat LED line into a second, brighter line reflected at eye level.
2. Floating shelves and display cabinets
Recess a profile into the underside of a shelf for a flush detail, or mount it near the front edge to illuminate objects below. Inside a display cabinet, angled profiles can direct light toward the contents while hiding the source behind the frame.
Glass shelves may use purpose-built edge-lighting profiles, but the effect depends on glass treatment, edge quality, and light coupling. Build one shelf before ordering the whole display. Transparent materials have a habit of exposing every shortcut with admirable honesty.
3. Wardrobes and closets
Vertical profiles near the front of a wardrobe can light clothing more evenly than one source at the top. A shallow recessed channel keeps hangers from striking the diffuser. Door sensors or occupancy controls can switch the light without adding a visible wall control.
Leave space for cable bends at the top or bottom of each profile. Put connectors where they can be reached after the cabinet backs and shelves are installed. A hidden connector is elegant until it becomes a failed hidden connector.
4. Stair treads, risers, and handrails
Profiles recessed into risers can wash each tread. Handrail profiles can provide a continuous low-level line, while stair-nosing systems combine light with edge protection. Select products designed for the intended load and mounting position.
Aim the light down and across the walking surface. Avoid placing a bright diffuser where it faces someone climbing the stairs. Coordinate wiring, access, tread finish, slip resistance, and local building requirements before fabrication.

5. Ceiling coves
An aluminum profile gives a cove a straight thermal base and a controlled aiming surface. Use it to wash the ceiling, the upper wall, or both. A deeper profile can shield the strip from common viewing angles, while a corner profile can hold a repeatable beam direction.
Plan access for cleaning, joints, power feeds, and the driver. On long runs, coordinate voltage drop and feed locations with the strip supplier. Do not assume the last meter will match the first because they share a postal code.
6. Wall grazing and window reveals
Place a narrow recessed or surface profile close to a wall to emphasize texture. Use a greater offset for a softer wash. Window reveals can hide a profile while creating a thin vertical or horizontal line that frames the opening after dark.
Straightness matters because the wall becomes the measuring instrument. Any wobble changes the distance between source and surface, producing alternating bright and dark bands. Mock up corners and window heads, where joints and cable exits are easiest to notice.
7. Trimless ceiling and wall lines
Plaster-in profiles can leave only the diffuser visible. They work best when coordinated before board fixing and finishing. Protect the diffuser groove from compound and paint, and use a temporary insert if the profile supplier provides one.
The structure must hold the profile straight before plaster tries to hide it. Plan how the diffuser and strip will be removed later. A trimless detail should hide the fixture, not bury it archaeologically.
8. Suspended linear fixtures
A larger profile can become the body of a suspended luminaire over desks, tables, reception counters, or retail displays. It may provide direct light, indirect light, or separate channels for both.
Coordinate suspension points, structural anchors, power feeds, driver location, end-cap retention, and glare control. Long fixtures need alignment hardware and tolerance for ceiling variation. Gravity will review the design whether the project team schedules that review or not.

9. Backlit stone, acrylic, and translucent panels
Profiles can hold linear sources behind translucent stone, acrylic, fabric, or resin panels. The goal is even luminance without bright stripes. Source spacing, distance to the panel, diffuser choice, panel transmission, and internal reflectance all affect the result.
Build a full material sample with the actual panel thickness and finish. Some natural materials vary from sheet to sheet, so one small swatch may flatter the concept more than the installed wall will.
10. Mirrors, vanities, and headboards
Profiles beside a mirror can provide vertical facial light. Profiles behind a mirror can create a halo, but that reflected glow does not replace front light when accurate grooming or makeup visibility matters.
At a headboard, aim the profile for reading or indirect ambient light without exposing the diffuser to someone lying down. In bathrooms, use a complete luminaire and electrical system approved for the location. The aluminum channel alone is not a moisture rating.
11. Retail and hospitality displays
Retail shelves, bars, reception desks, and hotel joinery often repeat the same lighting detail many times. A profile makes that detail easier to control across installers and locations. The specification should fix the strip, diffuser, finish, clips, feeds, and approved sample.
Check color quality with the products and materials being displayed. Also check dimming at low output. A smooth line at full power can reveal uneven sections or driver behavior once the scene drops to evening levels.
12. Outdoor and wet-area architectural lighting
Exterior lines can mark paths, reveal facades, or light landscape edges. Wet-area systems need compatible profiles, diffusers, end seals, cable glands, connectors, fasteners, and drivers. The assembly must be rated and installed for its actual exposure.
Consider water direction, drainage, condensation, ultraviolet exposure, temperature cycling, cleaning, salt, and physical impact. Adding sealant to a standard indoor profile does not create a tested outdoor product. It creates a field experiment, and the weather has unlimited test time.
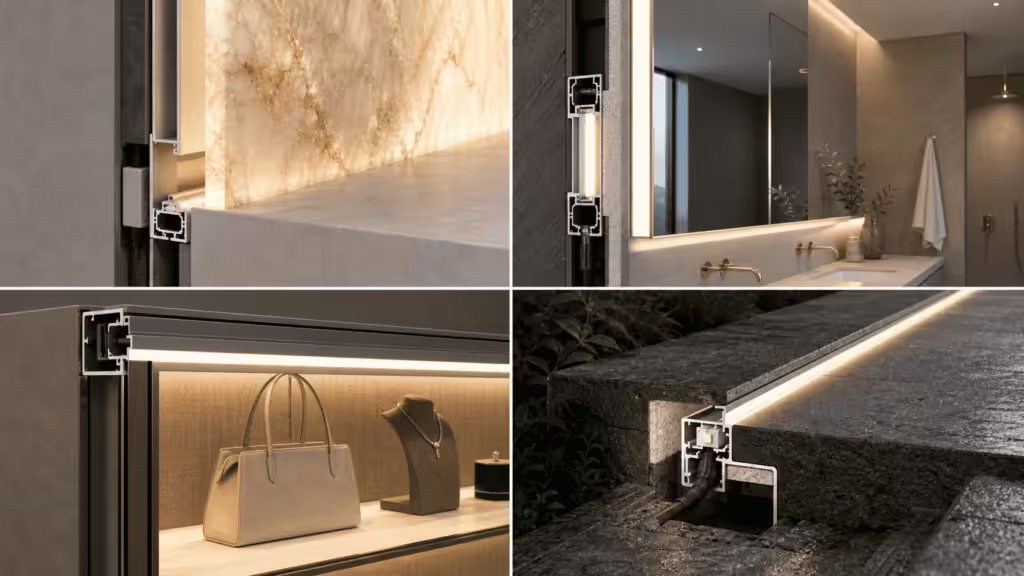
How to make linear lighting look intentional
Match profile depth to LED pitch
Visible dots occur when the light from neighboring emitters has not blended before it reaches the diffuser. Increasing channel depth often helps, but there is no universal depth that guarantees a smooth result. Strip pitch, emitter geometry, diffuser opacity, lens shape, output level, and viewing distance all matter.
Chip-on-board (COB) strips can create a smoother line in shallow channels because their emitting area is more continuous. Dense surface-mount device (SMD) strips can also work well when paired with enough mixing distance and the right diffuser. Test the exact combination rather than buying each component from a separate beauty contest.
Choose clear, frosted, or opal diffusion
A clear cover protects the strip while preserving a sharp view of the emitters. It suits hidden sources or applications where maximum visual punch matters more than concealment. Frosted covers soften the points while keeping a brighter appearance. Opal covers provide stronger blending and lower apparent glare, with some loss of output.
Do not rely on generic transmission percentages. Material, thickness, additives, texture, profile shape, and the supplier’s test method all change the number. Use the product data sheet and measure a representative assembly when output matters.
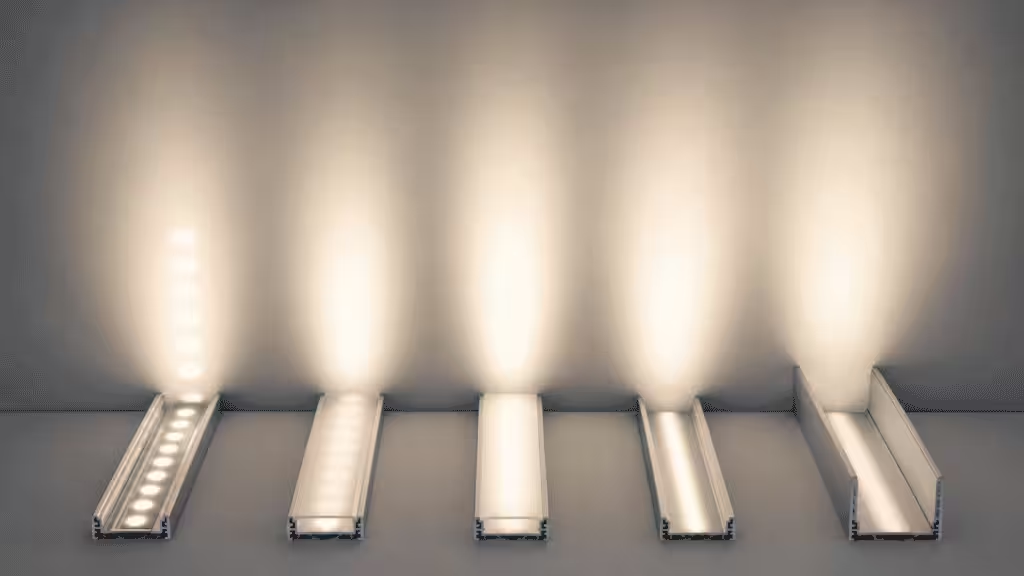
Control glare from normal viewing angles
Glare depends on source brightness, apparent size, contrast, angle, and time of exposure. A diffuser may reduce sharp hotspots, but it can still become a bright visible line. Recessing the source, changing the profile angle, lowering output, or moving the profile outside the normal view can help more.
Check reflections from glass, polished stone, glossy cabinets, screens, and mirrors. Review the room from seated, standing, and approach positions. The installer staring directly into the profile from a ladder is not the only user, even if that is the easiest angle to photograph.
Plan finishes, corners, and long-run joints
Approve finish samples under the project’s lighting. Decide how inside corners, outside corners, intersections, and terminations will look before cutting. Mitered corners need controlled saw setup and deburring. Butt joints need alignment and support.
Long aluminum lengths expand and contract as temperature changes. Use the supplier’s allowance and mounting method. Do not lock every joint solidly, then act surprised when a diffuser bows or a gap relocates itself.
Hide cable exits without blocking service access
Draw the power path on the same detail as the profile. Show feed direction, conductor size, cable exit, strain relief, connector space, driver, controls, and access panel. Long runs may need power injection or more than one driver, based on the strip and driver limits.
Keep solder joints low enough to clear the diffuser. Deburr every cable opening and protect insulation from metal edges. The cleanest visible line usually comes from doing more work in the invisible parts.

Engineering checks behind a clean lighting design
Verify the thermal path
LEDs send heat through the package and circuit board rather than radiating most of it forward as light. The U.S. Department of Energy’s LED Basics notes that product differences can include lifetime, color quality, optical performance, and dimming behavior. Temperature affects several of those outcomes.
For each run, record strip power, length, ambient temperature, duty cycle, mounting surface, profile geometry, and the strip supplier’s temperature limits. Bond a temperature sensor near the critical area and wait for the assembly to reach a stable condition. Shiny aluminum can mislead an infrared thermometer. Its emissivity, or ability to emit infrared energy, affects the reading.
Treat mounting as both a structural and thermal joint
Clips, screws, and structural tape solve different problems. Clips make removal easier. Screws can hold a profile on uneven or overhead surfaces. Tape can provide continuous contact when the substrate and load are suitable.
Our extruded thermal-product catalog includes clips, tape, captive screws, push pins, and wire or anchor methods. That range reflects a useful rule: attachment belongs in the design, not in the installer’s improvisation budget.
For adhesive mounting, follow the adhesive supplier’s surface and load guidance. 3M’s VHB surface-preparation guide recommends an isopropyl alcohol and water mixture for cleaning most suitable substrates. Porous, oxidized, oily, painted, or low-energy surfaces may need more preparation. Test the actual materials and operating temperature.

Specify the complete enclosure for wet or dusty locations
IEC 60529 classifies degrees of protection provided by enclosures against access, solid objects, and harmful water ingress. The enclosure is the tested assembly. For linear lighting, that may include the profile, diffuser, gaskets, end caps, cable entries, connectors, joints, and installation orientation.
Ask for the rating and test basis of the complete product in the intended configuration. Drilling extra holes, cutting seals, mixing accessories, or using an unapproved connector can change its protection. Follow local electrical rules for wet zones and outdoor circuits.
Test the assembly under realistic conditions
A one-meter sample can expose problems before they multiply across a project. Check dotting, glare, diffuser fit, clip force, finish, temperature, and cable routing. Use the real driver, controls, mounting surface, ambient condition, and operating time.
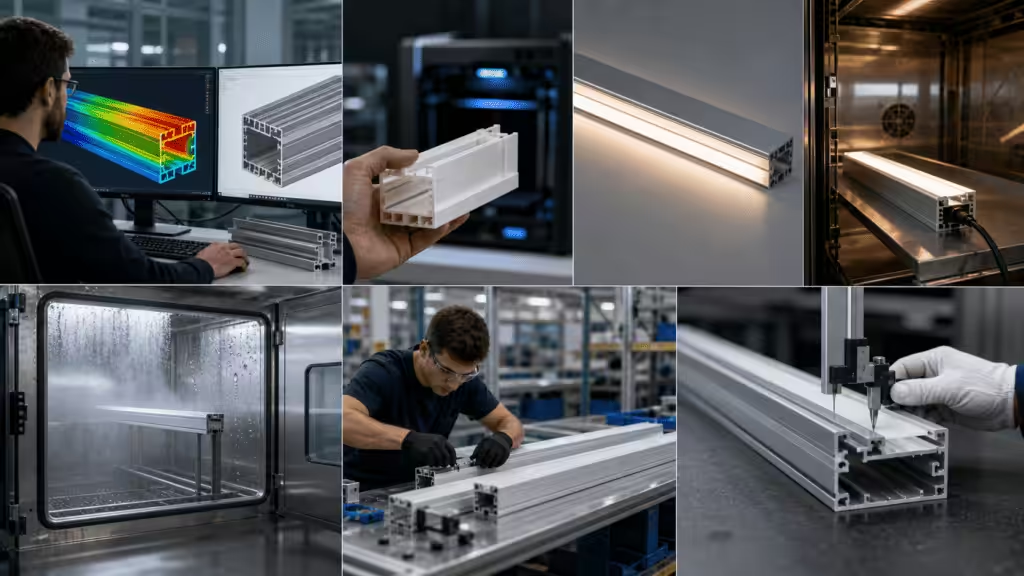
Our broader thermal-management work includes rapid temperature change, thermal shock, humidity, vibration, high-temperature aging, and salt-spray tests. Those are not automatic requirements for an indoor LED shelf. They show how validation should follow the environment and failure risk rather than a generic test menu.
Large custom programs can also borrow the sequence used in our automotive Advanced Product Quality Planning (APQP) work. Define requirements, validate samples, and run a controlled pilot. Release mass production after the evidence is complete. The discipline transfers. The automotive claim does not magically turn into an LED case study.

When does a custom LED aluminum profile make sense?
Start with the constraints a standard channel cannot solve
Use a standard profile when it meets the strip width, optical depth, thermal load, mounting, finish, accessories, and service requirements. Standard parts reduce tooling, development time, and minimum-order risk.
Consider a custom extrusion when one repeated detail needs an unusual width, deeper optical cavity, integrated screw boss, or hidden cable channel. Snap features, structural flanges, special finishes, and faster assembly can also justify custom work. The design should remove a real constraint. A unique cross-section created because the sketch looked lonely is still a tooling invoice.
Keep the cross-section extrusion-friendly
Extrusion works best when useful features run continuously along the length. Our manufacturing data identifies A6063 as a high-conductivity alloy for extruded thermal products. It also describes extrusion as suitable for high-volume production with low non-recurring engineering cost. The process is most cost-effective when heavy post-machining is not required.
Keep wall thickness practical, avoid trapped geometry, maintain tool access, and place material where it serves structure, heat spreading, optical control, or assembly. CNC machining can add holes, slots, pockets, and end features, but every secondary operation adds handling, tolerance stack, inspection, and cost.
The AEC redesigned LED heat-sink case gives a useful example of design for extrusion. A 6063 redesign removed unnecessary core mass, reduced weight by 47%, and increased surface area by 4%. It is not an architectural strip-light profile, but it shows why geometry can outperform simply adding aluminum everywhere.

Simulate, prototype, test, and then release tooling
Model the strip, contact layer, profile, mounting surface, orientation, ambient temperature, and airflow before locking the cross-section. Mechanical analysis checks deflection, clips, bosses, and suspension points. Thermal and fluid models help compare geometry under the defined conditions.
Our development workflow uses Ansys for mechanical analysis, Fluent for fluid behavior, and Flotherm for thermal simulation. In the documented thermal-product program, that optimized approach shortened the development cycle by 50%. That is an internal workflow result, not a universal promise. The useful lesson is to compare options before paying for metal and time.
Prototype the critical length and end details. Test optical uniformity, temperature, diffuser retention, mounting, cable routing, finish, and assembly time. Update the drawing from measured results, then release tooling.
Match the validation plan to the product risk
Our test operation includes 58 sets of professional equipment, 2,000 square meters of test space, and a 10-person test team. That capacity supports thermal, mechanical, environmental, failure-analysis, and production-validation work across thermal-management products.
A wardrobe profile does not need every test in that building. A suspended commercial fixture, exterior line, vehicle interior, or high-output custom luminaire may justify a broader plan. Define foreseeable failures first, then select tests that can expose them.
What does a premium LED profile really cost?
Compare installed cost, not channel price per meter. A useful project equation is:
Installed cost = profile + diffuser + end caps + mounting + cutting + wiring + drivers + controls + labor + testing + service access
A cheaper profile may cost more if its diffuser bows, clips need rework, joints refuse to align, or connectors do not fit. A custom extrusion may cost more at the start but reduce recurring drilling, brackets, separate cable covers, and assembly time. It earns that argument only when the volume and labor data support it.
Ask suppliers to separate tooling, extrusion, finishing, machining, accessories, inspection, packaging, and freight. Then add the site costs: substrate preparation, routing, access panels, electrical work, commissioning, and replacement access. This makes quotations easier to compare and gives value engineering somewhere useful to work.
Do not claim savings from longer LED life without temperature and product data. The profile influences thermal conditions, but the strip, driver, controls, ambient temperature, duty cycle, and installation all affect service life.
Common questions about LED aluminum profiles
Do LED strips always need an aluminum profile?
No. A low-power strip in a protected, concealed application may work without one if the strip supplier allows that installation. A profile becomes useful when you need heat spreading, mechanical protection, straight mounting, a diffuser, controlled aiming, or a finished appearance. For higher output or enclosed applications, validate temperature with the selected strip and mounting conditions.
Which diffuser creates the smoothest line of light?
An opal diffuser often gives the strongest blending, but the smoothest result comes from the whole optical stack. Profile depth, LED pitch, emitter geometry, diffuser material, output, and viewing distance all matter. Test the exact combination. The word “opal” is a category, not a guarantee.
Can LED aluminum profiles be used in bathrooms or outdoors?
Yes, when the complete luminaire or enclosure is rated for the location and installed according to its instructions. Check the profile system, diffuser, seals, end caps, cable glands, connectors, driver, mounting orientation, and local wet-location rules. Bare aluminum and a bead of silicone do not create an IP certificate.
How do you prevent visible LED dots?
Use a COB or dense SMD strip, provide enough distance between the LEDs and diffuser, and choose a lens with suitable diffusion. Lowering output or moving the source outside direct view can also help. Mock up the normal viewing angle because a line that looks smooth from across the room may show dots from a nearby chair.
Can you cut LED aluminum profiles to length?
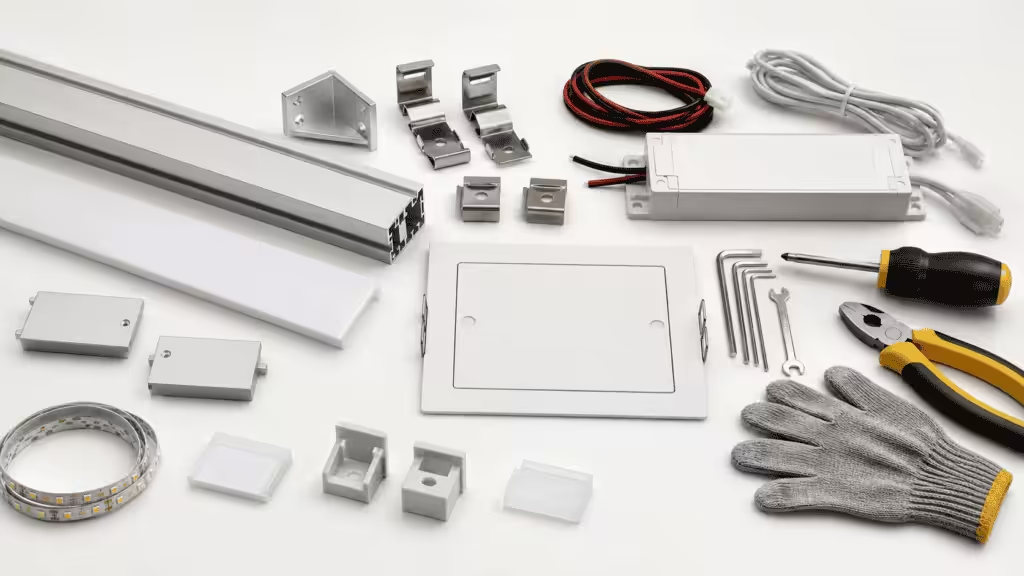
Most profiles can be cut with a suitable fine-tooth blade and proper support. Cut the aluminum and diffuser using the supplier’s recommended methods, then deburr and clean the channel. For measuring, cutting, mounting, wiring, and testing details, use our LED aluminum profile installation guide.
When is a custom profile worth the tooling cost?
A custom profile can make sense when standard channels cannot provide a repeated feature. The new design may reduce parts, machining, brackets, installation time, or visual compromises. Compare tooling and development cost against the recurring savings and expected volume. Include validation and finish samples in that calculation.
Final design brief before ordering
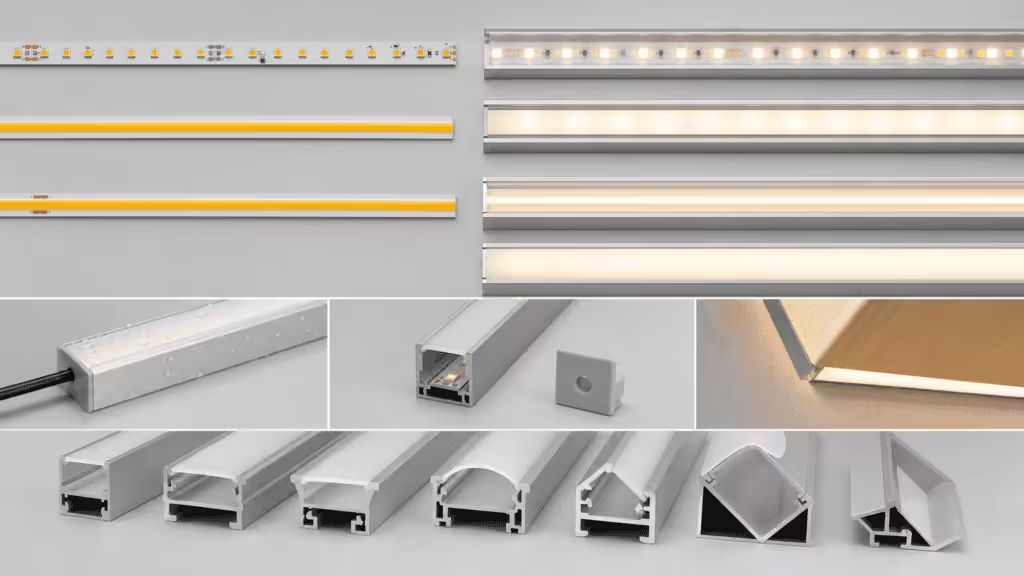
Before approving a profile, record:
- Lighting job and target surface
- Normal viewing positions
- Strip model, voltage, power, width, pitch, and cut interval
- Internal profile width, depth, base thickness, finish, and length
- Diffuser material, appearance, retention, and replacement method
- Mounting substrate, clips, screws, or approved adhesive
- Cable exits, connectors, power injection, driver, controls, and service access
- Ambient temperature, moisture, dust, cleaning, impact, and required rating
- Joint, corner, expansion, and finish-sample details
- Prototype test conditions and acceptance criteria
Approve one representative run before releasing the full order. Include the longest electrical path, worst viewing angle, actual mounting surface, final diffuser, real controls, and expected ambient condition. One honest mockup is cheaper than a building full of synchronized disappointment.
For detailed installation steps, read How to Choose and Install LED Aluminium Profiles Like a Pro. For the manufacturing logic behind custom cross-sections, see Why Extruded Aluminum Heat Sinks Outperform Others. The fundamentals of conduction, convection, and thermal resistance are covered in Aluminum Heatsinks: Types, Function, and Efficiency Explained.
We support custom thermal design, simulation, extrusion, machining, finishing, prototyping, and validation for products that need more than a catalog channel. Send the strip data, target light effect, mounting section, environment, expected length, and annual volume. Those inputs are enough to start a useful engineering review instead of a quotation-shaped guessing game.